Web 应用接入 OAuth2
2023年12月27日 · 6989 字 · 14 分钟 · Web OAuth2 Google Apple Facebook
接入 Google、Apple 和 Facebook 三方授权登录,好几年前其实就做过这类需求了,刚好最近有一个项目又要做,发现一些交互细节的修改,文档藏的比较深,所以整理汇总了下文档资料,方便后面给团队同事参考用。
简单介绍下,OAuth(Open Authorization)是一个基于令牌的授权协议。即“Sign In with xxx”。主流平台都有提供的这项认证服务,可以通过第三方认证提供商进行身份验证和授权登录我们的应用,企业级应用一般都会上这个,方便资源拥有者(RO)使用在资源服务器(RS)的资源信息。更多了解参考下方链接。
实现第三方登录登录方案有三种:
- 集成第三方一键登录,例如:auth0
- 分别集成 GitHub、Google、Apple 登录 SDK
- 不集成 SDK 打开浏览器,统一走 Web 方式登录
下面主要是介绍第三种方式,纯 Web 方式登录。
官方文档
介绍 OAuth2 标准: 理解 OAuth 2.0 - 阮一峰的网络日志
Sign In with Apple: https://developer.apple.com/documentation/sign_in_with_apple/sign_in_with_apple_js https://developer.okta.com/blog/2019/06/04/what-the-heck-is-sign-in-with-apple
Sign In with Google:
https://developers.google.cn/identity/protocols/oauth2/javascript-implicit-flow?hl=zh-cn
Sign In with Facebook: https://developers.facebook.com/docs/facebook-login/
JS SDK https://developers.facebook.com/docs/javascript/reference/v18.0
手动构建登录流程,不走 SDK https://developers.facebook.com/docs/facebook-login/guides/advanced/manual-flow#logindialog
使用 Facebook 登录功能和现有应用登录系统集成 https://developers.facebook.com/docs/facebook-login/guides/access-tokens 获取长期口令
OAuth 工作流程
角色(Roles):
- 业务系统(我们的应用 Application)
- 前端(客户端 client )
- 后台(客户端 API)
- 用户(Resource Owner)
- 认证服务(Authorization server,Google、Apple、微信、QQ 等第三方授权服务器)
- 资源服务器 (Resource server)
流程(OAuth Flow):
客户端点击登录,此时浏览器导向授权服务器认证页面,携带客户端标识和重定向 URI。客户端向授权服务器请求授权,
授权服务器验证参数,然后用户未登录需先登录,并选择是否给该客户端授权。
用户同意授权,授权服务器将用户导向客户端事先指定的"重定向 URI"(redirection URI),同时附上一个 code 授权码(可能是 get,也可能是 post 方式)。
前端客户端收到授权码后,会通知客户端后台 API,通过 POST 请求,附上上次的一样的"重定向 URI",向授权服务器申请令牌(access_token)。这一步是在客户端的后端 API 隐藏式完成的,对前端侧的用户不可见。
授权服务器核对了授权码和重定向 URI,确认无误后,向客户端发送访问令牌(access token)或更新令牌(refresh token)。
客户端收到 token 后,传回给前端 view 并更新页面,用户登录成功。
以上登录流程已经完成,需要补充的是:此时客户端可以使用访问令牌向资源服务器请求资源了(具体要看申请了那些权限,如果只是 email 和 name,就没啥用)。
_PS: 由于产品要求用 Web 登录方案同时支持在 APP (Android、IOS)内的界面调用,所以在 APP 调起第三方授权页时,注意不能使用 WebView 模式,OAuth 2.0 政策不允许使用的嵌入式用户代理中(见下方说明)。官方推荐的方式,在 App 宿主情况下,应该使用 App 专用 SDK 拉起 第三方 登录,而不是走 Web ,如果一定要这么做可以 : _
- Android:Custom Tabs
- iOS:
- SFSafariViewController( iOS 9 ,与 App 相互隔离,它的数据是跟原生 Safari 共享的)、
- ASWebAuthenticationSession( iOS 12 ,可以理解成一个简化版的 APP 内置浏览器,可与 APP 共享数据,它是 Apple Authentication Services 框架的一部分,用于通过 web 进行身份验证)。 以上三种方式都可以在 APP 拉起一个原生浏览器的体验,而无需让用户离开你的应用,注意它们俩并没有 WKWebview 和 UIWebView 那么多强大的与原生交互的方法。
适用于客户端 Web 应用的 OAuth 2.0 | Authorization | Google for Developers
From Google documentation: if you get an error that says “403 disallowed_useragent,” the app uses embedded WebViews. Some developers use WebViews to help display web content in an app. Embedded WebViews puts your security at risk because they could let third parties access and change communications between you and Google. To keep your account secure, Google no longer allows embedded WebViews as of September 30, 2021.
几种认证模式:
授权码模式(是最复杂的,也是最安全的,上面流程就是这种,推荐使用)
- 客户端请求验证,由 用户获取 code
- 客户端后端拿着 code,去请求 token
- 销毁 code,下发 token,而用户拿不到 token,客户端保存
- 客户端使用 token 访问资源服务器的资源
- 过期后使用 refresh_token 刷新, token 再次使用
简化模式(为 web 浏览器应用设计,不支持 refresh token)
- 用户请求网站,如:http://www.baidu.com
- 重定向到一个授权页面
- 用户登录,并同意授权
- 重定向到网站,并带上 access_token 如:www.baidu.com?access_token=123
- 访问 资源服务器的资源
以 Gitee 网站为例,使用 GitHub 账号登录(授权码模式)
1、点击登录,触发到 GitHub 的认证页面 2、允许授权,302 重定向到 Gitee 的 redirect_uri 页面 3、页面 接受 code 参数后,请求后端,由后端再去获取 GitHub 的 accessToken,返回给前端 4、再次 302 重定向到 Gitee 首页,并携带 Cookie,完成用户登录成功状态。
https://github.com/login/oauth/authorize?client_id=5a179b878a9f6ac42acd&
redirect_uri=https%3A%2F%2Fgitee.com%2Fauth%2Fgithub%2Fcallback&
response_type=code&scope=user&
state=bc9c9fb74d0aa
认证后,重定向 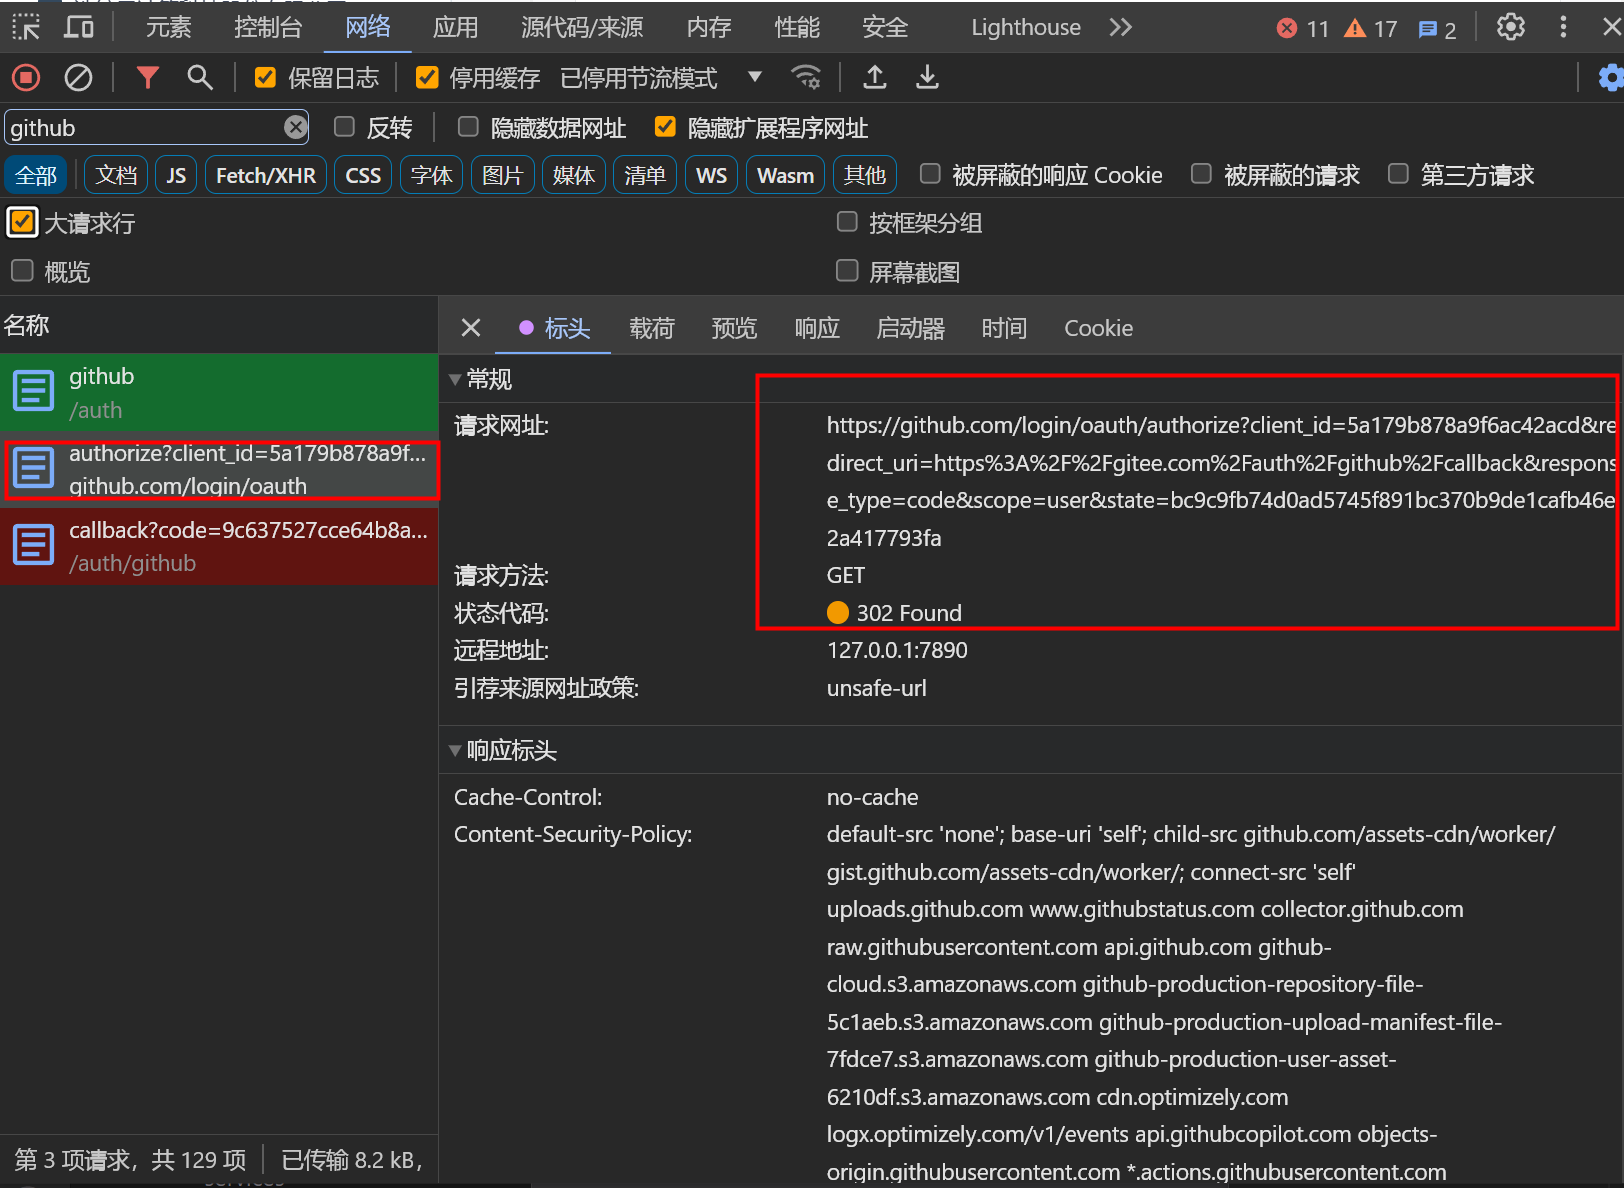
https://gitee.com/auth/github/callback?code=9c637527cce64b8a5736&state=bc9cfa
获取 GitHub 的 accessToken  重定向到首页
  流程完成,下面分别介绍三种,我们应用用上的 OAuth 场景。
集成 Apple 授权登录 (Sign in with Apple)
苹果官方文档: https://developer.apple.com/documentation/sign_in_with_apple (前端 js 调用,发起授权) https://developer.apple.com/documentation/sign_in_with_apple/sign_in_with_apple_rest_api( REST API ,后端同学看的)
第三方文档参考: https://zhuanlan.zhihu.com/p/632483498 Sign in with Apple NODE,苹果第三方登录 What the Heck is Sign In with Apple? Sign in with Apple Tutorial:
- Sign in with Apple, Part 1: Apps
- Sign in with Apple, Part 2: Private Email Relay Service
- Sign in with Apple, Part 3: Backend – Token verification
- Sign in with Apple, Part 4: Web and Other Platforms
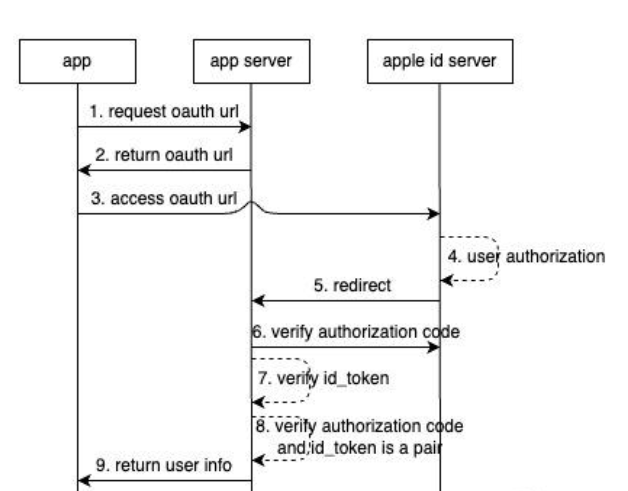
授权码模式(和 Google 不同的是,redirect-url 回传的 code 需要有一个 post 接口来接收):
app client 向 app server 请求 oauth url
app client 收到 url ,点击事件触发访问 oauth url,
跳转到 apple id server
用户在 apple id server web应用登录授权
apple id server 以 post 方式 回调 app server 的redirect url,并携带了code、id_token、user(仅第一次授权会返回)参数
app server 向 apple id server 验证 authorization code
app server 用 apple id server 提供的公钥解密 id_token,校验 id_token 参数
app server 验证 authorization code 和 id_token 是在同一个请求下发的
app server 成功返回用户信息给 app client
注册&配置 OAuth2 应用
参考官方文档即可。主要是为了 获取客户端 ID 和客户端密钥:注册成功后,OAuth2 提供商将为您的应用程序分配一个客户端 ID 和客户端密钥。还有重定向 redirectURI,这些凭据将在后续的 OAuth2 交互中使用。 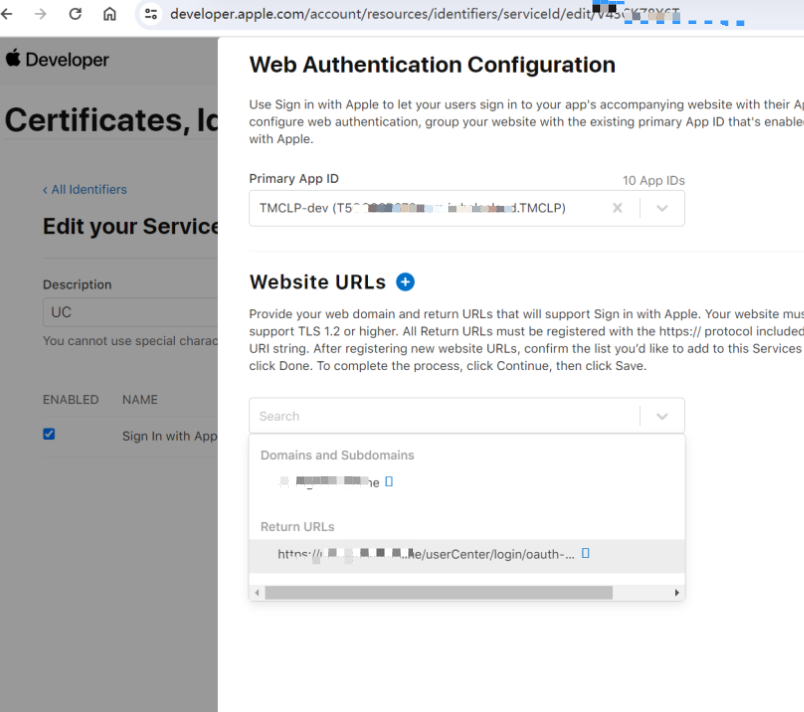 当配置结束后,我们将获得我们所需的两个文件、三个 ID、和一个 URL 连接,如下:
redirectURI = 'https://xx.xxx.online/login/oauth-url' // 自己设置的重定向域名,可添加多个
webClientId = 'com.xx.cn';  // 设置的client_id,一般是域名的反写
teamId = 'xx';  // 10个字符的team_id
keyId = 'KOI23S78J6';  // 获取的10个字符的密钥标识符
设置登录徽标样式 https://appleid.apple.com/signinwithapple/button 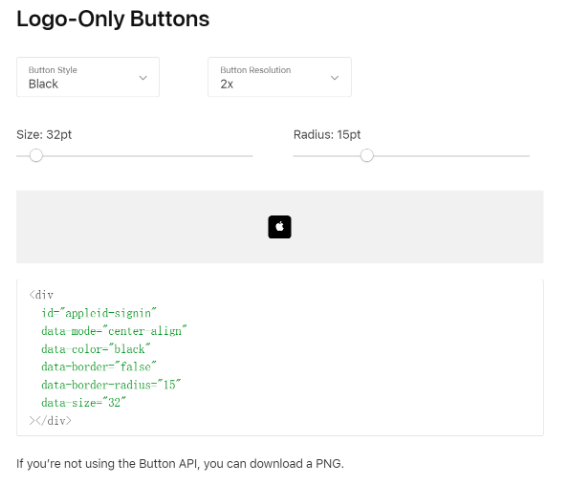
Web 代码实现 1( 这种是 OAuth 2.0 简化模式)
前端 SDK 触发
// 1\页面注入js sdk
<script  type="text/javascript" defer src="https://appleid.cdn-apple.com/appleauth/static/jsapi/appleid/1/en_US/appleid.auth.js"
></script>

// 2\初始化
useEffect(() => {
  AppleID.auth.init({
    clientId: APPLEKey,
    scope: 'email name',
    usePopup: true,
    redirectURI: redirectUrl,
    state: 'init00state',
    responseType: 'code', // 有效值为code和id_token。
  });
}, [APPLEKey]);


// 3\触发调用 将返回一个 promise 对象,该对象将在授权成功时解析。
const data = await AppleID?.auth?.signIn({
    clientId: APPLEKey,
    scope: 'email name',
    redirectURI: redirectUrl,
    state: 'signIn00state',
    responseType: 'code',
    responseDode: 'fragment',
    usePopup: true,
);
 console.log('APPLE signIn 的回调 datadatadata:', data);

// 4\处理响应、与自己的登录接口做交互,返回用户info,完成登录。
if (data?.authorization?.code) {
  const authTokenLocal = jwt.decode(data?.authorization?.id_token) || {};
  const oauthOpenId = get(authTokenLocal, 'sub');
  	handleLogin({
      oauthToken:authTokenLocal,
      oauthOpenId,
      platform: OAUTH_LOGIN_PLATFORM_TYPE.APPLE
    });
}
APPLE 登录成功的回调 data, 拿着 id_token 和自己的 后端 api 做绑定或登录,即完成业务。
{
  "authorization": {
    "code": "c0888ff1fe3d44df1ba57b4b7212d3081.0.rrvqs.m7NZ8kqhFhaYjpA1OTzNKA",
    "id_token": "eyJraRydWV9.NAGHwx9r_KQGnFksS_4aGx1w",
    "state": "signIn00state"
  }
}

// jwt.decode(response.authorization.id_token) 解析后的值:
{
     "authorization": {
       "code": "[CODE]",
       "id_token": "[ID_TOKEN]",
       "state": "[STATE]"
     },
     "user": {
       "email": "[EMAIL]",
       "name": {
         "firstName": "[FIRST_NAME]",
         "lastName": "[LAST_NAME]"
       }
     }
}
Web 代码实现 2( 这种是 授权模式)
手工触发 (授权模式)
https://appleid.apple.com/auth/authorize?client_id=[CLIENT_ID]&redirect_uri=[REDIRECT_URI]&response_type=[RESPONSE_TYPE]&scope=[SCOPES]&response_mode=[RESPONSE_MODE]&state=[STATE]

// 自定义按钮,这里是从 Apple JS 生成的 URL。
https://appleid.apple.com/auth/authorize?client_id=[CLIENT_ID]&redirect_uri=[REDIRECT_URL]&response_type=code id_token&state=[STATE]&scope=[SCOPES]&response_mode=form_post

https://appleid.apple.com/auth/oauth2/v2/authorize

  const oauthSignInApple = (key) =>{
    const url = 'https://appleid.apple.com/auth/authorize';
    const appleBookForm = document.createElement('form');

    appleBookForm.setAttribute('method', 'GET');
    appleBookForm.setAttribute('action', url);
    const params = {
      client_id: key?.clientId,
      redirect_uri: key?.redirectUrl,
      response_type: 'code',
      scope: 'email name',
      response_mode:'form_post',
      state: OAUTH_LOGIN_PLATFORM_TYPE.APPLE,
      usePopup: false,
    };

    // Add form parameters as hidden input values.
    // eslint-disable-next-line no-restricted-syntax
    for (const p in params) {
      const input = document.createElement("input");
      input.setAttribute("type", "hidden");
      input.setAttribute('name', p);
      input.setAttribute('value', params[p]);
      appleBookForm.appendChild(input);
    }
    document.body.appendChild(appleBookForm);
    appleBookForm.submit();
  }
ASWebAuthenticationSession 代码实现(这种主要是 APP 端主导)
func oauthLogin(type: String) {
        // val GitHub、Google、SignInWithApple
        let redirectUrl = "配置的 URL Types"
        let loginURL = Configuration.shared.awsConfiguration.authURL + "/authorize" + "?identity_provider=" + type + "&redirect_uri=" + redirectUri + "&response_type=CODE&client_id=" + Configuration.shared.awsConfiguration.appClientId
        session = ASWebAuthenticationSession(url: URL(string: loginURL)!, callbackURLScheme: redirectUri) { url, error in
            if error != nil {
                return
            }
            if let responseURL = url?.absoluteString {
                let components = responseURL.components(separatedBy: "#")
                for item in components {
                    if item.contains("code") {
                        let tokens = item.components(separatedBy: "&")
                        for token in tokens {
                            if token.contains("code") {
                                let idTokenInfo = token.components(separatedBy: "=")
                                if idTokenInfo.count > 1 {
                                    let code = idTokenInfo[1]
                                    print("身份验证 code 码: \(code)")
                                    return
                                }
                            }
                        }
                    }
                }
            }
        }
        session.presentationContextProvider = self


// 版本2

// 在 iOS 12 中,ASWebAuthenticationSession 如果沒有 strong reference 的話就會消失掉,所以這邊先建立一個變數並放到 completion handler 裡,成為它的 strong reference。
var session: ASWebAuthenticationSession?

// 提供獲取 authorization code 用的 URL 與回傳 URL 的 scheme。
// 當使用者成功授權後,授權伺服器會傳送回傳 URL 給 session,而 session 會直接關掉瀏覽器並呼叫 completionHandler。
session = ASWebAuthenticationSession(url: url, callbackURLScheme: "app", completionHandler:  { callbackURL, error in

    // 使用者成功授權後,從回傳 URL 中抽取 authorization code 以進行後續步驟。

    session = nil
})

// 提供 session 用來顯示的視窗。
session?.presentationContextProvider = presentationContextProvider

// 告訴 session 啟動流程。
session?.start()
登录流程(手工模式)
用户点击 Apple 登录图标,会跳转到 Apple 登录网站,输入账号密码。首次登录会在任一 Apple 设备弹出原生登录授权验证(双重验证),输入 6 位随机验证码 即可登录完成。 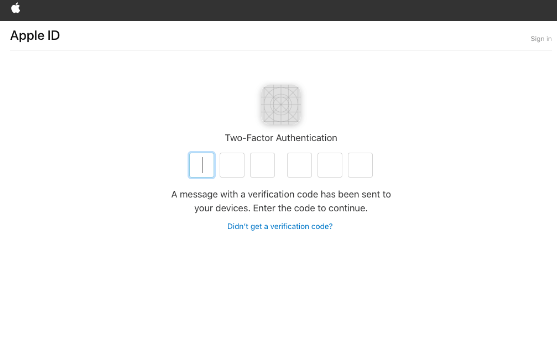 注意:首次登录会选择是否隐藏邮箱,选择隐藏将会使用 apple 提供的一个匿名邮箱而不是真实邮箱号。当选择信任浏览器后,之后在此浏览器中登录只需要输入账号、密码即可。
 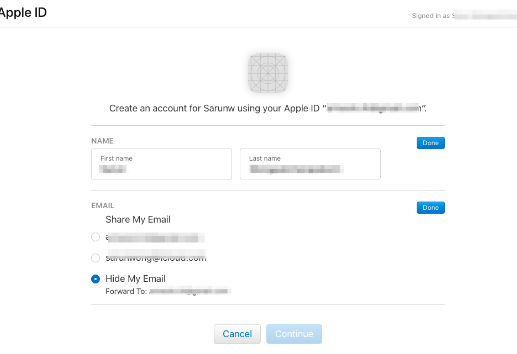 在登录后用户可以随时在 apple 设备上取消 apple id 在该程序上的授权登录。mac 上 safari 浏览器上可直接验证登录。也可以通过手机号等其他方式进行验证,apple 设备如果开启双重认证,会使用双重验证,简单说就是当你首次使用 Apple 登录一个设备时,在输入 Apple id 和密码之后,还需要在其他已登录的 Apple 设备上确认授权,并输入已登录设备上提供的验证码进行验证。
处理授权响应(分两种模式)
用户单击“使用 Apple 登录”按钮后,框架会将授权信息发送给 Apple。Apple 处理授权请求后: 如果是 usePopup 模式,是直接返回 data【简化登录模式】; 否则会将包含授权结果的 HTTP POST 请求发送到 中提供的 URL redirectURI【授权码模式】 。 HTTP 正文包含 content-type 为 application/x-www-form-urlencoded 的结果参数。成功的响应包含以下参数: 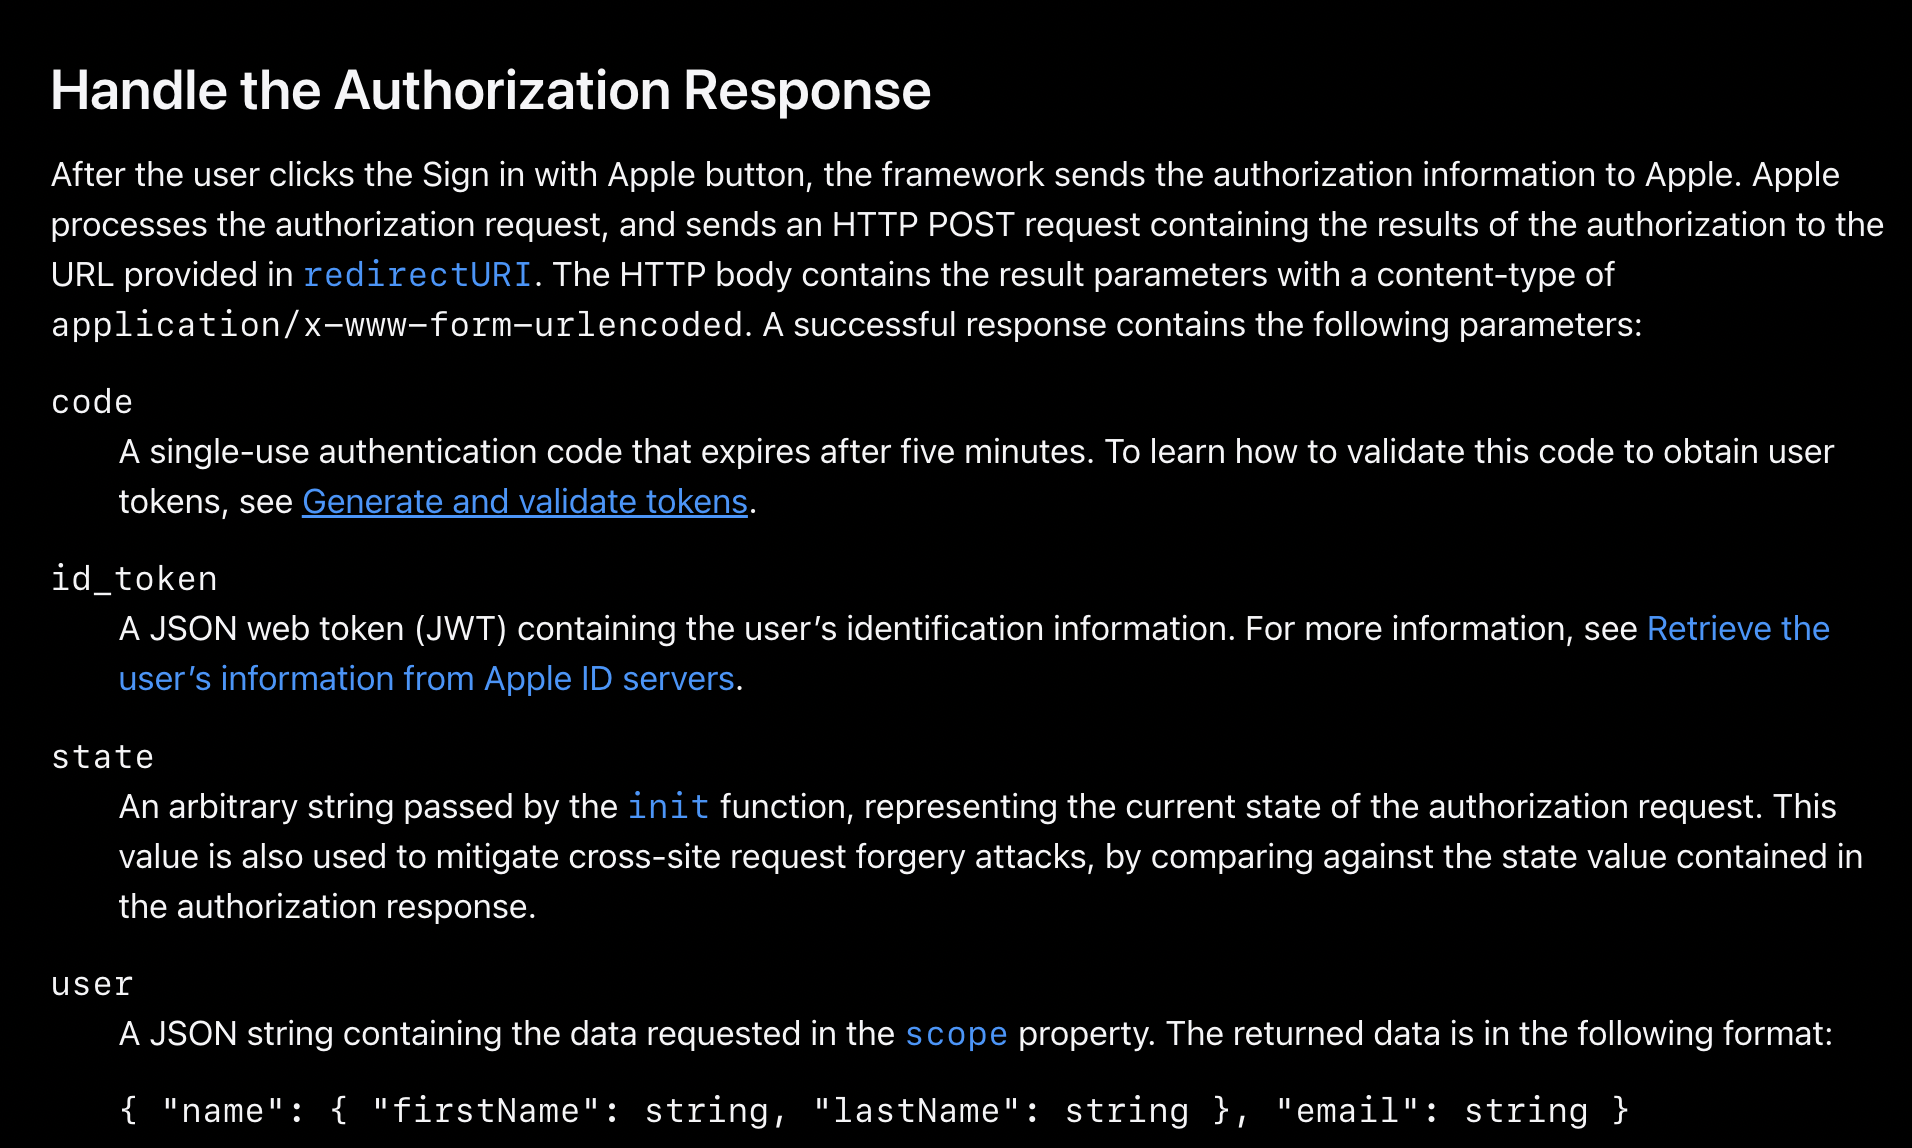 对应的接收端拿到这个值之后进行处理,返回给前端即可实现登录。返回给前端可以是 302 重定向方式,将 authorization 信息携带在 cookie 中。如果需要自己的 API 接口也走 302 重定向到中间过渡页,可以这样来访问接口:不用 http 请求,直接走 form 表单 或 window.location.href 就会让页面类型变成 【document/Redirect】。需要注意 Document Redirect 与 XHR Redirect 区别。
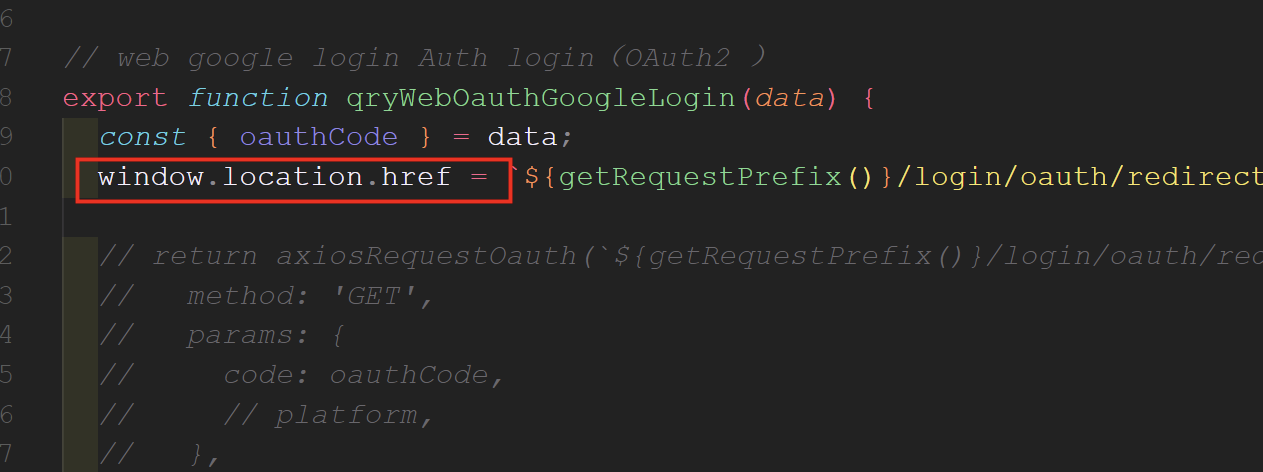
额外补充的小知识: form 表单请求属于 document 请求类型,天生不会有跨域问题. 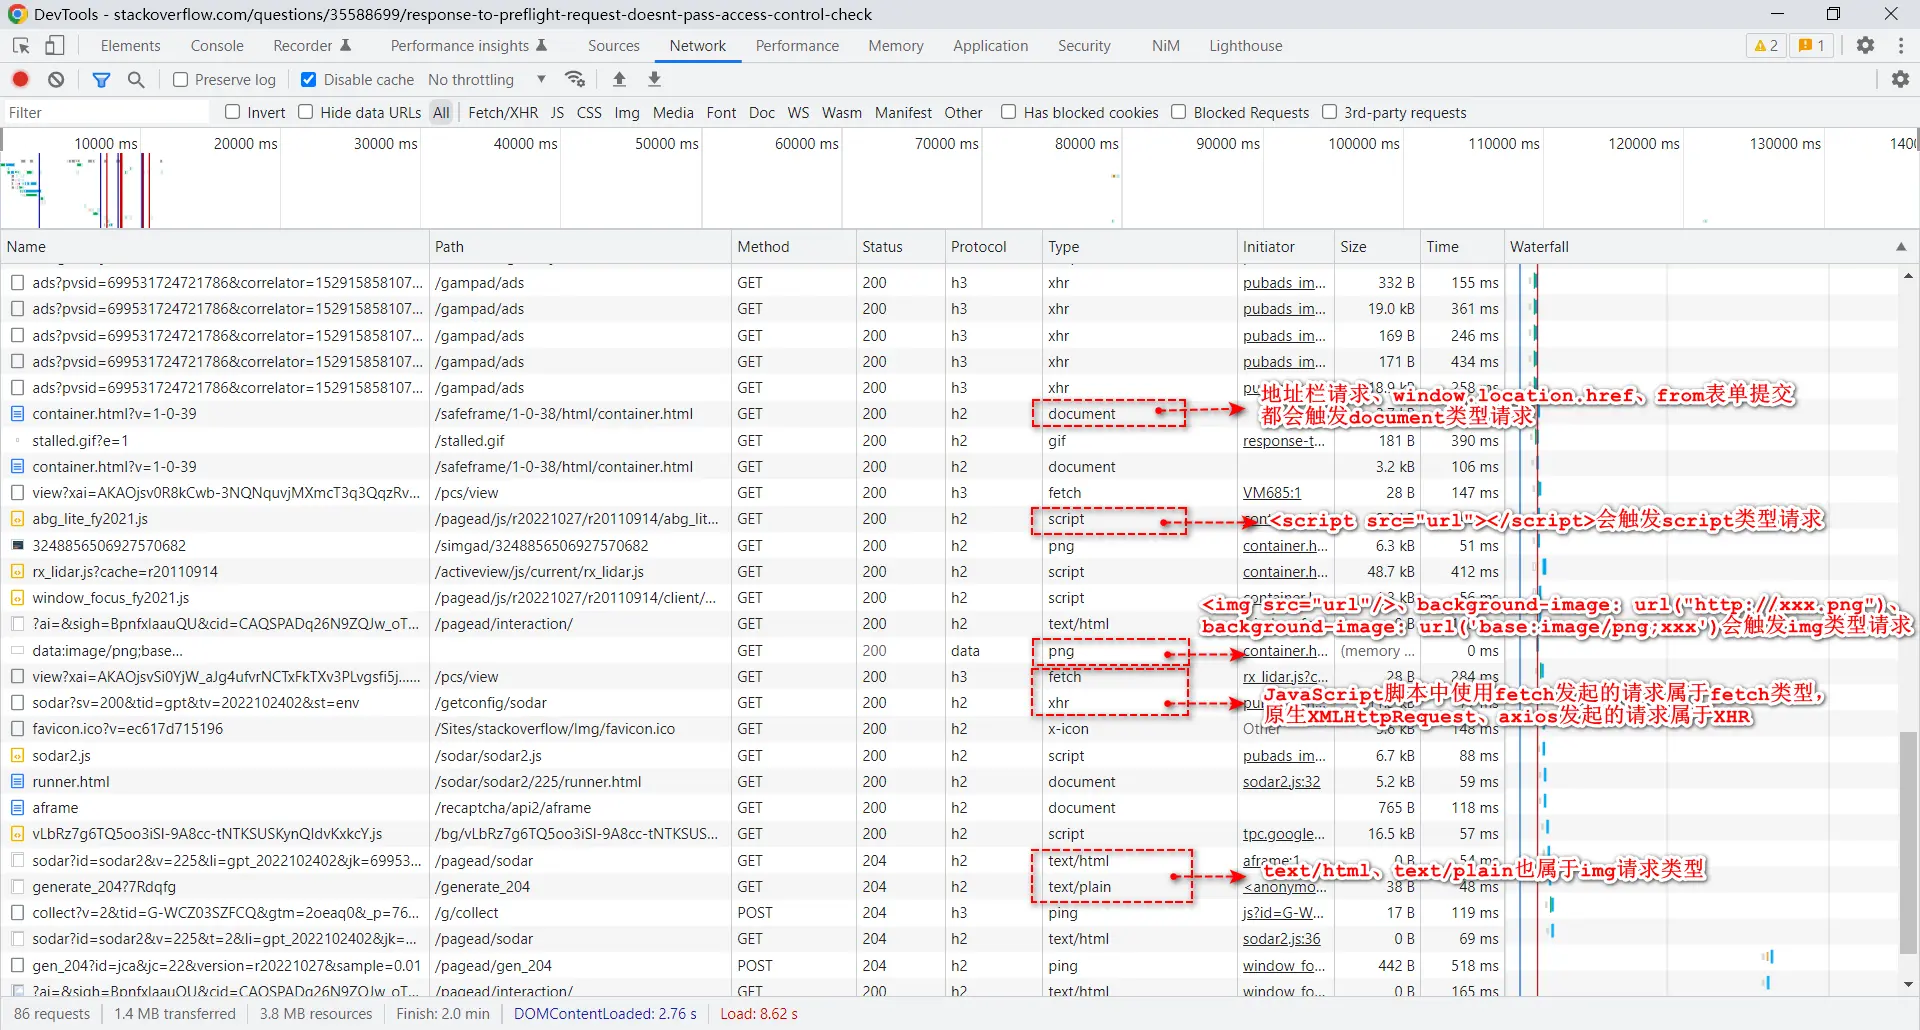 Document Redirect 是由服务器直接触发的浏览器重定向,而 XHR Redirect 是由 JavaScript 中的 XMLHttpRequest 对象发送请求并处理重定向的方式。
集成 Google OAuth2
需要注意
一、 google 的 gsi/client 和 oauth2 的区别
Google Identity Services (GIS) 的 gsi/client 是用于实现用户登录的 JavaScript 库。它可以帮助开发者在网页中集成“使用 Google 账号登录”的功能。当用户点击登录按钮后,gsi/client 会弹出一个 Google 登录界面,用户可以选择使用他们的 Google 账号进行登录。这样,开发者就可以通过 gsi/client 获取用户的身份信息,比如用户的邮箱地址等。 OAuth2 则是通过授权 code,来获取访问令牌,然后使用该访问令牌来调用 Google API 或其他受保护的资源。
综上: gsi/client 用于前端直接新开一个弹窗,实现帮用户用 Google 实现登录网页的功能。【简化模式】 OAuth2 则是先获取访问令牌后,Google 重定向页面 URL 得到后授权码 code,拿这个授权码去接口去授权,适合在不能弹窗的场景下使用。【授权码模式】
二、不允许使用的嵌入式用户代理中
Google 的授权页面,在 Google 的 OAuth 2.0 政策中 disallowed_useragent 要求不能被 webview 嵌套。解决办法在下面: Android 开发者在 android.webkit.WebView 中打开授权请求时可能会遇到此错误消息。开发者应该改用 Android 库,例如适用于 Android 的 Google 登录或 OpenID 基金会的 AppAuth for Android。当 Android 应用通过嵌入式用户代理打开常规 Web 链接,且用户从您的网站转到 Google 的 OAuth 2.0 授权端点时,Web 开发者可能会遇到此错误。开发者应允许在操作系统的默认链接处理程序(包括 Android App Links 处理程序或默认浏览器应用)中打开常规链接。Android 自定义标签页库也是一个受支持的选项。 iOS 和 macOS 开发者在 WKWebView 中打开授权请求时可能会遇到此错误。开发者应该改用 iOS 库,例如适用于 iOS 的 Google 登录或 OpenID 基金会的 AppAuth for iOS。当 iOS 或 macOS 应用在嵌入式用户代理中打开常规 Web 链接,且用户从您的网站转到 Google 的 OAuth 2.0 授权端点时,Web 开发者可能会遇到此错误。开发者应允许操作系统的默认链接处理程序(包括通用链接处理程序或默认浏览器应用)中打开常规链接。SFSafariViewController 库也是一个受支持的选项。
Web 代码实现 1(这种属于 授权码模式)
授权码模式是最复杂的,也是最安全的
- 客户端发起请求验证,由用户获取 code
- 客户端拿到 code,请求 token
- 销毁 code,下发 token,而用户拿不到 token,客户端保存
- 客户端使用 token 访问资源
- 过期后使用 refresh_token 刷新, token 再次使用
Create form to request
/*
  * Create form to request access token from Google's OAuth 2.0 server.
  */
const oauthSignIn = (key) => {
  // Google's OAuth 2.0 endpoint for requesting an access token
  const oauth2Endpoint = 'https://accounts.google.com/o/oauth2/v2/auth';

  // Create <form> element to submit parameters to OAuth 2.0 endpoint.
  const googleForm = document.createElement('form');
  googleForm.setAttribute('method', 'GET'); // Send as a GET request.
  googleForm.setAttribute('action', oauth2Endpoint);

  // Parameters to pass to OAuth 2.0 endpoint.
  const params = {
    client_id:clientId,
    redirect_uri: redirectUrl,
    response_type: 'code',
    scope: 'https://www.googleapis.com/auth/userinfo.profile',
    include_granted_scopes: "true",
    state: OAUTH_LOGIN_PLATFORM_TYPE.GOOGLE,
  };

  // Add form parameters as hidden input values.
  // eslint-disable-next-line no-restricted-syntax
  for (const p in params) {
    const input = document.createElement("input");
    input.setAttribute("type", "hidden");
    input.setAttribute('name', p);
    input.setAttribute('value', params[p]);
    googleForm.appendChild(input);
  }

  // Add form to page and submit it to open the OAuth 2.0 endpoint.
  document.body.appendChild(googleForm);
  googleForm.submit();
};
OAuth 2.0 服务器响应
// 正确响应:code交给自己的服务器api,完成后续操作。
http://oauth2.example.com/callback?state=G&code=4%2F0AfJohXmMnygj-k1dcfv8k8bObKZOkeg&scope=email+profile+https%3A%2F%2Fwww.googleapis.com%2Fauth%2Fuserinfo.profile+openid+https%3A%2F%2Fwww.googleapis.com%2Fauth%2Fuserinfo.email&authuser=0&prompt=none

// 错误响应:
https://oauth2.example.com/callback#error=access_denied
拿到回传的 code 交给自己的服务器 api,完成后续认真操作这,最后自己的 api 返回 authorization 信息,保存即可。
Web 代码实现 2(这种属于简化模式)
// 传统 web登录
useEffect(() => {
  initGoogleScript();
}, []);


// eslint-disable-next-line no-unused-vars
const initGoogleScript = () => {
  // const script = document.createElement('script');
  // script.src = 'https://accounts.google.com/gsi/client';
  // document.head.append(script);
  function handleCredentialResponse(response) {
    const authTokenLocal = jwt.decode(response.credential) || {};
    console.log("GOOGLE 回调 authTokenLocal", response.credential,authTokenLocal);
    const oauthOpenId = get(authTokenLocal, 'sub');
    // const email = get(authTokenLocal, 'email');
    // 如果是走前端自己组织的URL,才和APP相同的处理函数
    if (oauthOpenId) {
      loginSuccess(res);
    }
  }

  loadScript('https://accounts.google.com/gsi/client', () => {
    console.log('loadScript....');
    try {
      // eslint-disable-next-line no-undef
      google.accounts.id.initialize({
        client_id: '643984392818-v2aad7hxx3r65h29imbq4d.apps.googleusercontent.com', //  GOOGLE_CLIENT_ID,
        callback: handleCredentialResponse,
      });

      // eslint-disable-next-line no-undef
      google.accounts.id.renderButton(
        document.getElementById('btn-google-login'),
        {
          icon: 'standard',
          type: 'icon',
          shape: 'circle',
          theme: 'outline',
          text: 'signin_with',
          size: 'large',
        }, // customization attributes
      );
      // google.accounts.id.prompt(); // also display the One Tap dialog
    } catch {
      //
    }
  });
};


// 动态加载Google js sdk 的
export const loadScript = (url, callback) => {
  const script = document.createElement('script');
  script.type = 'text/javascript';
  // script.async = 'async';
  script.async = true;
  script.src = url;
  document.body.appendChild(script);
  if (script.readyState) {
    // IE
    script.onreadystatechange = () => {
      if (script.readyState === 'complete' || script.readyState === 'loaded') {
        script.onreadystatechange = null;
        callback();
      }
    };
  } else {
    // 非IE
    script.onload = () => {
      callback();
    };
  }
};


// 登录成功桥接 app 的方法
const loginSuccess = resp => {
  console.log(' 登录成功桥接 app 的方法', resp);
  const { token } = resp || {};
  if (token && window?.uc) {
    window?.uc.loginSuccess(JSON.stringify(resp));
  }
};


// 下面交给 APP 桥接 loginSuccess 处理了
/*
const { userInfo, refreshToken, token, tokenExpiryDate } = res;
const initApp = {};
if (refreshToken) {
  let obj = { ...initApp, token, refreshToken };
  if (userInfo) {
    obj = {
      ...obj,
      userInfo: { ...userInfo },
      tokenExpiryDate,
    };
  }
  window.localStorage.setItem('initApp', JSON.stringify(obj));
} */
jwt.decode(response.credential) 解析后的
{
    "iss": "https://accounts.google.com",
    "azp": "81003223604-bkldme1v3h23gjhrhaircmc8up16or.apps.googleusercontent.com",
    "aud": "8100253423604-bkldme1v3hoh423rhaircmc8up16or.apps.googleusercontent.com",
    "sub": "102254845571180493426",
    "email": "majinyun0k@gmail.com",
    "email_verified": true,
    "nbf": 1698739691,
    "name": "yun 1",
    "picture": "https://lh3.googleusercontent.com/a/ACg8ocI8ip3BmBXZJLyK8YIJqzN86nbmrF1AboScE8Gk1MdVR2Y=s96-c",
    "given_name": "yun",
    "family_name": "Mark",
    "locale": "zh-CN",
    "iat": 1698739991,
    "exp": 1698743591,
    "jti": "cc011e8dc96a4f788af3c"
}
集成 Facebook OAuth2
平台注册,获取应用设置
https://developers.facebook.com/apps/xx2992667/settings/basic/
账号
1014xx2992667
口令:
b1ce44exxxbca231
Web 代码实现 1(这种属于简化模式)
<script type="text/javascript" defer  src="https://connect.facebook.net/en_US/sdk.js" ></script>


// 初始化
useEffect(() => {
   FB?.init({
      appId: FACEBOOKKey,
      xfbml: true,
      cookie: true,
      version: 'v18.0',
 });
}, []);


// 触发事件
FB.login(function(response) {
   if (response.status === 'connected') {
   	 statusChangeCallback(response);
   }
});

// 也可以调用 FB.getLoginStatus检查登录状态
FB.getLoginStatus(function(response) {

   if (response.status === 'connected') {
   	 statusChangeCallback(response);
   }
});

// response
{
    status: 'connected',
    authResponse: {
        accessToken: '...',
        expiresIn:'...',
        reauthorize_required_in:'...'
        signedRequest:'...',
        userID:'...'
    }
}


//statusChangeCallback 处理逻辑
  const authTokenLocal = jwt.decode(response?.authResponse?.accessToken) || {};
  const oauthOpenId = get(authTokenLocal, 'sub');
  console.log('FACEBOOK signIn 解析后的 authTokenLocal:', authTokenLocal);
  handleOauthLogin({
    // eslint-disable-next-line camelcase
    oauthToken: response?.authResponse?.accessToken,
    oauthOpenId,
    platform: 'F',
    version: '',
    // email,
  });
authResponse
{
    "authResponse": {
        "userID": "861892xxx14591",
        "expiresIn": 516xx03,
        "accessToken": "EAAj1IkmDxFEu6XfenkWOgZAinMdX6dG2gdrrGB719B56h2e81ZCxZCgwhgvLfwpciNcZD",
        "signedRequest": "jd9",
        "graphDomain": "facebook",
        "data_access_expiration_time": 170xx47
    },
    "status": "connected"
}
Web 代码实现 2(这种属于 授权码模式)
在不使用 SDK 的情况下为网页或桌面应用实施基于浏览器的登录,可以使用浏览器重定向来构建自己的登录流程。 https://developers.facebook.com/docs/facebook-login/guides/advanced/manual-flow#exchangecode 当用户点击 Log in with Facebook 时,发出如下 HTTP POST 请求:
// diglog 模式
https://www.facebook.com/v18.0/dialog/oauth?
  client_id={app-id}
  &redirect_uri={"https://www.domain.com/login"}
  &state={"{st=state123abc,ds=123456789}"}

// demo
https://www.facebook.com/v18.0/dialog/oauth?client_id={app-id}&display=popup&
response_type=code&redirect_uri=ms-app://{package-security-identifier}

// 返回值
https://www.domain.com/login?state="{st=state123abc,ds=123456789}"

// error 返回值
YOUR_REDIRECT_URI?
error_reason=user_denied
&error=access_denied
&error_description=Permissions+error.
注意:redirect_uri 值 在应用面板左侧导航菜单的产品下点击 Facebook 登录,然后点击设置。在客户端 OAuth 设置部分验证有效的 OAuth 重定向 URI。
登录支持 OpenID Connect (OIDC) 标准的授权代码流程和代码交换证明密钥 (PKCE)这种也属于 授权码模式
https://developers.facebook.com/docs/facebook-login/guides/advanced/oidc-token
https://www.facebook.com/v11.0/dialog/oauth?
  client_id={app-id} // Replace with your application’s ID
  &scope=openid
  &response_type=code
  &redirect_uri={"https://www.domain.com/login"}  // Replace with your Redirect URI
  &state={"state123abc"} // Replace with your State param
  &code_challenge={"E91k-123k123-115X"} // Replace with your generated code_challenge
  &code_challenge_method=S256 // Replace with the method used to generate the code_challenge
  $nonce={"123"} // Replace with a randomly generated nonce value


// 返回值,拿着code 去这个接口换口令令牌  /oauth/access_token
https://www.domain.com/login?state=state123abc&code={authorization-code}


发出请求

 /*
  * Create form to request access token from Google's OAuth 2.0 server.
  */
  const oauthSignInGoogle = (key) => {
    // Google's OAuth 2.0 endpoint for requesting an access token
    const oauth2Endpoint = 'https://accounts.google.com/o/oauth2/v2/auth';

    // Create <form> element to submit parameters to OAuth 2.0 endpoint.
    const googleForm = document.createElement('form');
    googleForm.setAttribute('method', 'GET'); // Send as a GET request.
    googleForm.setAttribute('action', oauth2Endpoint);

    // Parameters to pass to OAuth 2.0 endpoint.
    const params = {
      client_id: key?.clientId,
      redirect_uri: 'http://localhost:8000/userCenter/login/SignIn', // key.redirectUrl,
      response_type: 'code',
      scope: 'https://www.googleapis.com/auth/userinfo.profile',
      include_granted_scopes: "true",
      state: OAUTH_LOGIN_PLATFORM_TYPE.GOOGLE,
    };

    // Add form parameters as hidden input values.
    // eslint-disable-next-line no-restricted-syntax
    for (const p in params) {
      const input = document.createElement("input");
      input.setAttribute("type", "hidden");
      input.setAttribute('name', p);
      input.setAttribute('value', params[p]);
      googleForm.appendChild(input);
    }

    // Add form to page and submit it to open the OAuth 2.0 endpoint.
    document.body.appendChild(googleForm);
    googleForm.submit();
  };
用户一旦拒绝授予某权限,除非您明确告知登录对话框您正在重新请求已拒绝的权限,否则登录对话框不会重新请求该权限。只需在登录对话框网址中添加 auth_type=rerequest 参数即可:
https://www.facebook.com/v18.0/dialog/oauth?
    client_id={app-id}
    &redirect_uri={redirect-uri}
    &auth_type=rerequest
    scope=email
使用短期口令交换长期口令
默认的用户和主页访问口令为短期口令,会在数小时后过期,可以使用短期口令交换长期口令。请向以下 OAuth 端点发出 HTTP GET 请求:
GET
	 https://graph.facebook.com/v18.0/oauth/access_token?
   client_id={app-id}
   &redirect_uri={redirect-uri}
   &client_secret={app-secret}
   &code={code-parameter}

{
  "access_token": {access-token},
  "token_type": {type},
  "expires_in":  {seconds-til-expiration}
}
另外还有以下可选参数:
- response_type。确定重定向回应用时所包含的响应数据是网址参数形式还是网址片段形式。请参阅验证身份部分,选择应用应使用的参数类型。这些参数的类型可为以下其中一种:
- code。所包含的响应数据为网址参数形式,且包含 code 参数(每个登录请求独有的加密字符串)。如果未指定此参数,则此为默认行为。当服务器处理口令时,此行为尤为实用。
- token。所包含的响应数据为网址片段形式,且包含访问口令。桌面应用必须为 response_type 使用此设置。当客户端处理口令时,此行为尤为实用。
- code%20token。所包含的响应数据为网址片段形式,且包含访问口令和 code 参数。
- granted_scopes。返回逗号分隔列表,其中包含用户在登录时授予应用的所有权限。可与其他 response_type 值合并。与 token 合并时,所包含的响应数据为网址片段形式;与其他值合并时,所包含的响应数据则为网址参数形式。
- scope。逗号或空格分隔列表,其中包含要向应用用户请求的权限。
应用已有登录系统,结合 Facebook 登录
可能需要处理更复杂的情况 用户使用他们的电子邮箱和密码注册应用,但之后又想使用 Facebook 登录获取 Facebook 帐户的数据,以便向时间线发帖或用于在今后登录您的应用。 用户使用他们的电子邮箱和密码注册应用,但之后又单独选择通过 Facebook 登录。本指南假定用户最初提供的邮箱就是与用户的 Facebook 帐户关联的首选邮箱。 用户使用 Facebook 登录注册应用,之后又想使用电子邮箱和密码登录此帐户。 下面这个指南,介绍了处理这些情况的最佳方式。 https://developers.facebook.com/docs/facebook-login/guides/advanced/existing-system
本教程完毕。